Authenticating Azure AD App by using MSAL, MS Identity & MS Graph

Introduction: All my articles are compiled into simple steps with detailed screen shots and elaborative description. By following these steps even, a novice programmer should be able to replicate scenario. Please go through the steps and provide your valuable feedback to make my next articles more clearer and intent.

Note: I took help of various internet sources while researching this item. Credit goes to internet and Microsoft communities. This is one of the topics in Azure certification.

This is my fourth article on Azure.

Please follow below links for my previous Azure articles

Azure WebApps

Azure Logic App

Azure Event Grids

Azure SQL

Follow below mentioned 23 steps to Create Azure AD app and authenticate it with dot net application.

 After completing this blog, you will be able to do

  • Create Azure AD Application service
  • Understanding Microsoft Identity classes
  • Understanding Graph services

Sample Description: We are going to create a new Azure AD app and configure it to generate a key. Then create dot net console

Step 1: Open Azure portal (https://portal.azure.com)

Step 2: Create a new Azure AD application. This will be used to issues tokens for authenticate users. To create Azure AD application, Select Azure AD Directory from home page.

Step 3: After selecting Azure AD, Click on Manage> App registrations.

This Azure AD application will help you to issue authentication tokens and manage.

Step 4: Click on “New Registration” and create a new Azure AD app registration

Step 5: After creating Azure AD app, select and click on overview tab. Grab Application (client) ID and Directory (tenant) ID – these values will be used to connect this app from dot net code.

Step 6: Now it’s time to work on code part. Launch visual studio code and create a new console application by using below command. (You can give your own application name)

dotnet new console –name MatetiADConsole

Step 7: Open application by using visual studio code. Then run below command to install MS Identity library to application. We need this library to connect to azure and authentication services.

dotnet add package Microsoft.Identity.Client –version 4.7.1

Step 8: Open Program.cs, remove existing code and add code as mentioned in further steps. First add name spaces mentioned as below

using Microsoft.Identity.Client;

using System;

using System.Collections.Generic;

using System.Threading.Tasks;

Step 9: Create class Program and a Main method and 2 constants to store client id and tenant id we captured earlier

Step 10: Now assign the values of client id and tenant id we captured erlier

Step 11: With in main method declare a variable(app) of IPublicClientApplication and initialize. While initializing, provide client id and tenant id’s we provided. This will be used to connect to Azure AD App we created in previous steps.

Step 12: Declare a list of scopes and assign value of “user.read”

Step 13: Call app. AcquireTokenInteractive which will contact azure ad app and gets the authentication token. Now your program.cs looks as below

Step 14: Now run your application by using “dotnet run” command. Console application will contact to azure and gets the authentication token. When you run the application, it will prompt you to authenticate azure environment

Step 15: Now run and install MS Graph & MS Graph Authentication packages as mentioned below.

Microsoft Graph is the gateway to data and intelligence in Microsoft 365. It provides a unified programmability model that you can use to access the tremendous amount of data in Microsoft 365, Windows 10, and Enterprise Mobility + Security. Use the wealth of data in Microsoft Graph to build apps for organizations and consumers that interact with millions of users.

 dotnet add package Microsoft.Graph –version 1.21.0

dotnet add package Microsoft.Graph.Auth –version 1.0.0-preview.2

Step 16: Now we need to add code related to MS Graph. This code will be used to send information to user (it’s a kind of OTP stuff). Add below mentioned using statements at the top. This will allow you to use classes in Graph name space.

using Microsoft.Graph;    

using Microsoft.Graph.Auth;

Step 17: Remove authenticateresult we added earlier and declare variable of DeviceCodeProvider class. While creating this object, pass app and scope as parameters.So the devicecodeprovider object which we initialized will be used to connect to the Azure AD app we created earlier.

Step 18: Create object of GraphServiceClient and pass devicecodeprovider as parameter.

Step 19: Now using client object we created in previous step, make an api call access Me directory, which will give access to your Azure AD.

Step 20: By using myUser object you can access complete profile of yours. You can display information what ever you want.

Step 21: Now run your application by using dotnet run command. It will provide you key which has been provided by Azure ID.

Step 22: As mentioned launch https://microsoft.com/devicelogin and key in the provided key. This key has been generated by the Azure AD app.

Step 23: App has been authenticated

By using above steps, you authenticated Azure AD app and its key.

Happy Coding!!!

Build applications to interact with Azure SQL server database

Introduction: All my articles are compiled into simple steps with detailed screen shots and elaborative description. By following these steps even, a novice programmer should be able to replicate scenario. Please go through the steps and provide your valuable feedback to make my next articles more clearer and intent.

Note: I took help of various internet sources while researching this item. Credit goes to internet and Microsoft communities. This is one of the topics in Azure certification.

This is my fourth article on Azure.

Please follow below links for my previous Azure articles

Azure WebApps

Azure Logic App

Azure Event Grids

After completing this blog, you will be able to do

  • Create and deploy SQL Server database in azure
  • How to develop applications to pull data from sql server

Sample Description: We are going to create a dot net core application which reads data from sql server, pulls images from blob container and displays data to user

Step 1: Open Azure portal (https://portal.azure.com)

Step 2: Create a new resource group by clicking on Resource Groups icon on home page.

What is Resource Group? – Resource group is a container which holds all resources for an azure application. It’s a kind of grouping and managing resources.

Step 3: Create a storage account as shown below. Later we will create 2 blob containers to store images and sql server backup file.

Step 4: Create a blob container and name it as images. Upload few images from your local machine. These images will be retrieved by a dot net core application in later steps. Access level I choose as anonymous so that I can access this blob from outside.

Step 5: Create another blob and name it as databases. Choose access level as private, so that you can not access this from outside. We will use this blob to store sql back up file. In later steps we will use this back up file and restore a database.

Step 6: Now we need to create  a sql server database. Click on Create Resource > Search for “Azure Sql” > Select & Click on Create. Then select Sql databases and create

Step 7: Create SQL database as shown below. In this step we will create Test database(which we never use). The main purpose of this step to create Sql server instance. Later we import a sql server database in this server. If you want you can Test database to create resources like tables, functions & stored procedures.

First, we need to create a database server. Click on Create new option under server field and create a new database server as shown below.

Step 8: While creating database in next step select below 2 options which provides access to this database.

Step 9: Select the database server we created in previous step and select “Firewalls and virtual networks” under security tab. Then click on Add Client IP button, which adds IP address of the client. This option is mandatory to provide access of this database server. Then save the changes.

Step 10: In this step we will create a new database by importing the back up file we uploaded in earlier step. Select database server and Click on Import database option.

Step 11: Select Storage account and select the database file from blob container.

Step 12:  To verify database restore, select the database and run below queries in sql query editor

Step 13: Go to Connection Strings tab and grab the ADO.NET connection string. Update the password with actual password and keep it secure. We will use this connection string later in code.

Step 14: Go to the image blob we created earlier and grab the URL

Step 15: Now we need to work on code side. By using visual studio code, open the Adventures work solution. As my focus is on azure, not going to details of dot net core application. You can get this code from Microsoft official git hub.

When you open application, it might ask to restore the packages, select and restore packages. Then open terminal and run “dotnet build” command, which will complete the restore and fix other errors (if exists).

Step 16: Open “Application.json” and assign the value of images blob we created in earlier steps to “BlobContainerUrl” property. This property will be used by application, to connect to blob and retrieve images.

Also create another property in application json to hold sql connection string we copied from the Azure sql database we created.

Your application json looks like below.

Step 17: Below is the snap shot of my sql context class which is responsible to get data from azure sql database. As I mentioned earlier, I am not going put more focus on code part. Please let me know if more explanation required for code.

Step 18: Below is the snap shot of UI, which gets images from blob container and displays to user.

Step 19: Now its time to build and deploy our code. Open new terminal and run dotnet build command.

Step 20: Navigate to web folder using command prompt and run “dotnet run” command. This command will run and deploy application locally in port number 5000.

Step 21: Open your browser and run the URL “http://localhost:5000/”. Application has been installed in your local, which is pulling data from Azure SQL and Blob data sources.

Happy Coding!!!

Understanding Event Grids & Event Viewer in Azure

Title: Understanding Event Grids & Event Viewer in Azure

Introduction: All my articles are compiled into simple steps with detailed screen shots and elaborative description. By following these steps even, a novice programmer should be able to replicate scenario. Please go through the steps and provide your valuable feedback to make my next articles more clearer and intent.

Note: I took help of various internet sources while researching this item. Credit goes to internet and Microsoft communities. This is one of the topics in Azure certification.

This is my third article on Azure. Please follow below links for my previous Azure articles

Azure WebApps

Azure Logic App

Follow below mentioned 16 steps to publish & subscribe events to event grids in azure.

What is Event Grid in Azure? – Azure Event Grids allow us to build applications with event driven architecture. Applications which need to update data on timely manner needs this kind of architecture. Examples are share market site – need to update data accurately when there is a change in server. When there is a change, server will notify all the users with updated data. And applications will receive that data and display on screen with out any user action. This is also called as Pub/sub event.

After completing this blog, you will be able to do

  • You will understand the concept of Event Grid Topic
  • How to bind Event Grid Topic with web apps
  • Dot net code to submit messages to event grid topic

Step 1: Open Azure portal (https://portal.azure.com)

Step 2: Create a new resource group by clicking on Resource Groups icon on home page.

What is Resource Group? – Resource group is a container which holds all resources for an azure application. It’s a kind of grouping and managing resources.

Give a unique group name and use the region whichever is near to you.

Step 3: Create a new Event grid topic. Click on Create Resource> Search with Event Grid Topic and Click on Create.

Step 4: In next tab select Event Grid Schema for Event Schema parameter.

Event Schema has 3 possible options. Internal mechanism is in json format.

Event grid schema – Microsoft provided

Cloud event schema – Open source

Custom schema – You can define your own schema.

Step 5: Create a new web application in Azure.

This time I choose docker container/linux to deploy my application.

Step 6: Select web application created in previous step. Go to the settings and properties pane. Copy the value from URL box. This value we will use in later steps.

Step 7: Launch the URL copied in previous step and observe interface. This application is going to be the listener which subscribes the event we created previously.

Step 8: Now its time to subscribe the event with the application we created. Select the Event Grid Topic we created in step 3. And click on New Event Subscription. While creating the event subscription select Endtype as web hook. That means we are subscribing the event by using web hook.

Prefix https and suffix /api/updates to the url we copied in previous steps. Add this value to the Endpoint while creating the subscription.

Step 9: See the JSON view for the event we created and review the json data.

Step 10: Now we need to collect some data from the event grid. Select the event grid and copy the Topic Endpoint value, we will use this later in code. After that go to the Settings> Access Keys and copy value from Key 1

Step 11: Now we need to work on data net code part. Create a new dot net core application.

In program.cs create 2 parameters and assign the values we copied from topic end point and access key in previous step.

Step 12: Add below code which connects to the event grid we created and adds events to it.

Step 13: To simplify the things, I added simple code. If you want, you can create an interactive application which takes input from user and submit that data to event grid.

Step 14: Now build application and deploy. As shown below

Step 15: Now you deploy the application. After deployment a message will be written to event grid and that will be displayed in the web application we created. Please open the web application we created earlier.

Step 16: Now your web application is updated with the messages we submitted to event grid. There is no user intervention required to see the updated data.

Please feel free to define your own dot net code to make it more interactive.

Happy Coding!!!

Usage of Logic Apps in Azure to automate the business needs

Introduction: All my articles are compiled into simple steps with detailed screen shots and elaborative description. By following these steps even, a novice programmer should be able to replicate scenario. Please go through the steps and provide your valuable feedback to make my next articles more clearer and intent.

Note: I took help of various internet sources while researching this item. Credit goes to internet and Microsoft communities.

This is my second article on Azure.

Please click below link to read my other azure articles

Building a web API & web application on Azure platform as a service. – Site Title (wordpress.com)

Follow below mentioned 28 steps to build and deploy a Logic App to automate business needs.

After completing this blog, you will be able to do

  • Create Logic app by using Azure
  • Create API management resource

Step 1: Open Azure portal (https://portal.azure.com)

Step 2: Create a Resource Group as shown below

Step 3: Create an API Management resource as shown below. First Click on Create a Resource link on home page. Search with API Management Link and Click on Create button.

While creating API resource please select consumption plan(which will be scaled based on consumption

What is API Management resource? – Azure API management(APIM) helps organizations to publish there API’s to external, partner and internal developers to unlock the potential of their data and services.(FROM MS)

Step 4: Now we need to create a new logic app. Click on Create a Resource, search for Logic app and click on Create.

Step 5: Now create a storage account as shown below.

Step 6:  Now its time to upload files to storage account we created in previous step. By using storage account, we can store data in the form of blob, files, tables, queues, etc. Please see storage account definition I gave in my other articles.

Step 7: Select the storage account we created in step #5 and click on File Service tab> file shares link.

Step 8: Now click on Add File share link and create a new file share. This file share can be used to upload your files.

Step 9: Select the file share created in previous step and upload files.

Step 10: These sample files I downloaded from github. You can create your own json file. Snap shot of the json file given below.

Step 11: Now its time to work on logic app functionality. Select logic app created in earlier steps and select a Blank Logic App option.

Step 12 : Previous step will produce an interface as shown below.

Step 13: This is an interface to add our work flow logic. It is similar like writing different conditions (like if else in c#), the difference is instead of logic, we will add triggers and actions.

Step 14: Now I need to add a trigger when http request is received. To do that search top text box with “When a HTTP request is received “  and a trigger will be appeared as shown below.

Step 15: Select the Trigger highlighted in previous image to add a new trigger and interface looks like below

Step 16 : Now select the Add new parameter dropdown and select method check box.

Step 17: Now your interface looks below. Select option of get. We added a get method as parameter for this when http request received trigger. What does it mean, when we receive a http request this get method will be executed

Step 18: Now click on next step and add an action to the flow. Search the text box with “List files “  and select Azure file Storage option as shown below. Then click on create.

Step 19 : It will display all the storage accounts available on your server. Select the right storage account and give a connection name

Step 20: Then select the file share folder we created earlier.

Step 21: Till now we configured second step in work flow as an action. This action will retrieve the files we stored in storage account file share based on the trigger we configured earlier. Now add new step, search with Select keyword and select “Select Data Operations” in actions tab.

Step 22:And add the an action as shown below

Step 23: Then search with a response key word and select Response action as shown below. Now we are going to define the response object for this trigger.

Step 24: Define status code and body of the response as shown below.

Step 25: We completed our workflow design as shown above. Now select the API management we created earlier in this article. After selecting API management, go to API tab and create a new logic app.

Step 26: Create a new logic app as shown below.

Step 27: After creating the logic app. Select it and click on the get method we defined and go to test tab.

Step 28: Initiate the get method and observer the json data got received from API. Now you should be able to see the data from the json file we uploaded earlier.

Logic apps will be used in azure in numerous ways. We can use logic apps to automate the work flows and events. Will publish more articles on Logic apps in near future.

Happy Coding.

Building a web API & web application on Azure platform as a service.

Introduction: All my articles are compiled into simple steps with detailed screen shots and elaborative description. By following these steps even, a novice programmer should be able to replicate scenario. Please go through the steps and provide your valuable feedback to make my next articles more clearer and intent.

Srinivas

Note: I took help of various internet sources while researching this item. Credit goes to internet and Microsoft communities.

This is my first article on Azure.

Follow below mentioned 25 steps to build and deploy a web application on Azure platform as a service

After completing this blog, you will be able to do

  • Create various apps by using App Service.
  • Configure application settings for an app
  • Deploy apps by using Azure Command-Line Interface (CLI), and zip file deployment.

Step 1: Open Azure portal (https://portal.azure.com)

Step 2: Create a new resource group by clicking on Resource Groups icon on home page.

What is Resource Group? – Resource group is a container which holds all resources for an azure application. It’s a kind of grouping and managing resources.

Give a unique group name and use the region which ever is near to you.

Step 3: Now we need to create a storage account.

What is Storage account? – An Azure storage account contains all of your data objects like blobs, files, queues, tables and disks. Azure storage account provides a unique name space by using which you can access data over http & https. Data in azure storage account is durable, highly available, secure and scalable.

Create a new storage account by clicking on Storage Account button on home page or Create resource icon. While creating storage account, we need to provide the resource group just now we created.

In first tab select the resource group, give a unique name for storage account and select the appropriate location. Please leave the next tabs with default selections. And click on Create.

Step 4: Access the storage account once it is created. Go to the Access Keys section and copy the value from Connection String text box. The connection string we will used in our application at later stages to access the storage account.

Step 5: Now it’s time to create a blob container in storage account to store images. These images later can be accessed by our dot net application. Go to storage account we created in earlier steps. Select Container link in Blob service section and create a new container.

Step 6: Create a blob container as shown below. While creating the blob I choose anonymous read access, so that application can read blob data without any authorization.

Step 7: Access the images blob container just created in previous step and click on upload button to upload all your files. Here I am uploading all jpg files.

Step 8: 6 Files have been uploaded to our blob container as shown below.

Step 9: Now it’s time to create an app in azure so that we can deploy a dot net API application later to this app.  Click on App services button available on home page and add a new app service.

Step 10: Create new web app from app service as shown below. While creating, choose dot net core, so that we can deploy a dot net core application later. Please leave other tabs to default values. This app will be used like an api to access our blob container.

While creating the web app, create a new App service plan, the same need to used it for web application also.

Step 11: Please select the web app just now created and configure it to use the storage account we created in earlier steps. To do that, select configuration link in settings section and create a new application setting for web app.

Step 12: Create new application setting as shown below. Put the value of connection string we copied earlier while creating the storage account. Save the changes. Please make sure the same Name(MyConnectionString) is being used in API configuration code.

Step 13: Now select properties link from the settings section and copy the URL mentioned. This will be our API Link.We will use this URL later in our article.

Step 14: Now its time to look at dot net core API application, which can be used to access the blob container. Create a new API application by using dot net core. And open by using Visual studio code. ( You can use existing application available in github also). After creating API, add a new Controller and name it as ImagesController. This controller contains methods to read and write images from blob container we created in azure. Created HttPClient and Options variables and initialized in constructor. Created a method called “GetCloudBlobContainer” which initializes connection to blob and give the access.

Step 15: Created Get and POST methods to retrieve and post new images to the blob container.

Step 16 : Now it’s time to deploy this API to the web app we created in earlier steps.  Launch new terminal from visual studio code.

Step 17: Run the command AZ login, which will launch login page of azure. Give your credentials and authorise. Now your terminal connected to azure.

Step 18: Run below command to deploy API application to the web app we created. Below command will deploy the code as zip file. Please see the status code in below image after running the command.

az webapp deployment source config-zip –resource-group appSrcGrp –src api.zip –name imgapisrinivasmateti

Step 19: Your deployment was successful. If you browse the api URL, application will retrieve information from blob container as shown below.

Step 20: We already completed API deployment, Now we need to work on web application, which consumes above mentioned API. This web application is a user interface which reads and writes information to blob. Create a new web app in azure interface as shown below.

Step 21: As shown in step #11, create a key in the web application to store API url.

Step 22:Now we need to work on the web application code. Create a new dot net core application and add below mentioned code to application. Add 2 methods to get and post images by calling the API.

Step 23: Snap shot of view logic, to display and post images to azure container.

Step 24: After building the application, deploy the same to azure web app we created later in this article. Use below mentioned command to deploy the application.

az webapp deployment source config-zip –resource-group appSrcGrp –src web.zip –name imgwebsrinivasmateti

Step 25: Web application is deployed and now you can access it. Please see below mentioned snap shot after accessing application. You can upload images to Azure blob by using this web application.

Please try all above steps and let me know if you have any questions/suggestions.

Happy Coding!!!

Angular Interpolation using ngModel

Title :Angular Interpolation using ngModel

Description: Two-Way binding is key feature of angular. Two-way binding enable user to view changes with in no time. By using Interpolation {{}}, angular achieves Two-way binding. In Below example, I will define 2 text boxes and a label. Data entered in text boxes will be reflected in labels with out performing any action. The update will happen in the very moment when you enter text in text box.

Introduction: All my articles are compiled into simple steps with detailed screen shots and elaborative description. By following these steps even, a novice programmer should be able to replicate scenario. Please go through the steps and provide your valuable feedback to make my next articles more clearer and intent.

My Other Articles on Angular

Create Angular App

Angular Navigation

Angular Bootstrapping

This is 4th article on Angular.

Follow below mentioned 8 detailed steps to understand “Angular Interpolation using ngModel”.


Tools being used:

  • Angular CLI/Command prompt
  • Visual Studio 2017/ Visual Studio Code


Step 1: Create Angular Application and add a new component (named in this example as userComponent).

Step 2:  Add navigation link of newly added component to home page(for more details about how to add a navigation link, please click on Angular Navigation)

Step 3:   Add 2 text boxes and one label to usercomponent.html as shown below. In below image, textboxes have been highlighted with yellow colour. Label have been highlighted with green colour. In next steps by using interpolation, label will be updated with the text entered in both text boxes.

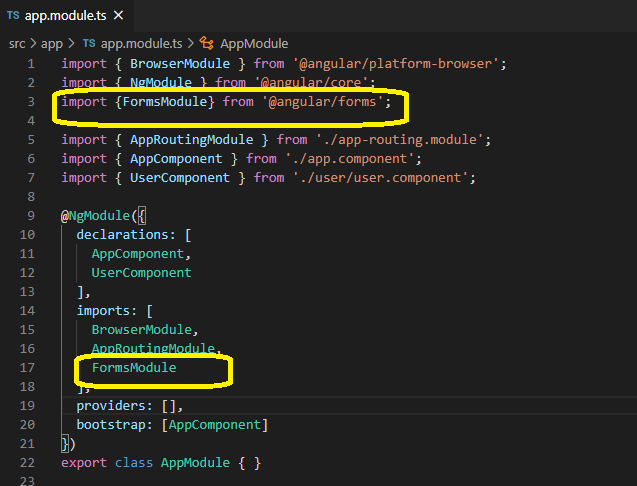
Step 4: Interpolation can be achieved by using ngModel. To use ngModel in our angular application, we need to import FormModule to app.module.ts file as shown below.

4_4_FormModule

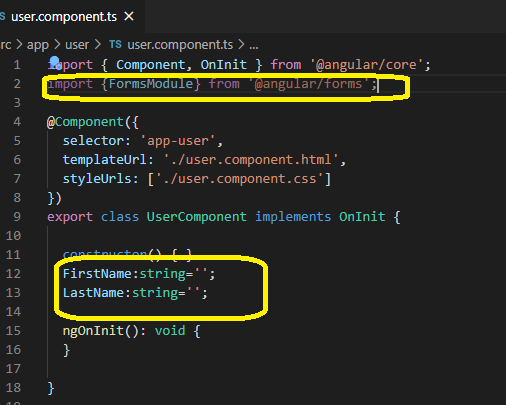
Step 5: Same FormModule need to be imported on the component where we are using.

Also, we need to declare model object in component.ts file. Here I am defining 2 model properties ‘FirstName’ and ‘LastName’.

4_5_ModelDec

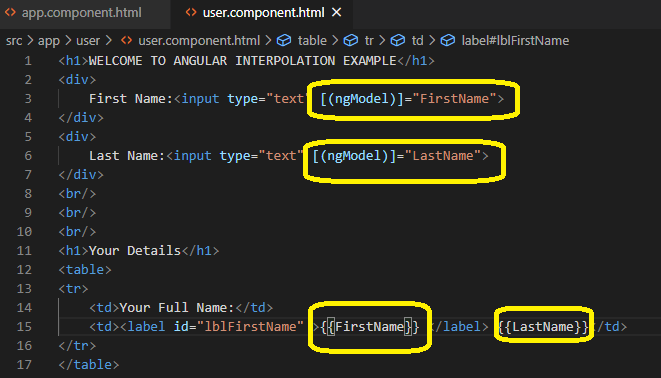
Step 6: Same model we declared in component.ts need to be used in component.html file. Bing these model property to text box by using ngModel. Bind model property to label by using {{}}

4_6_NgModel

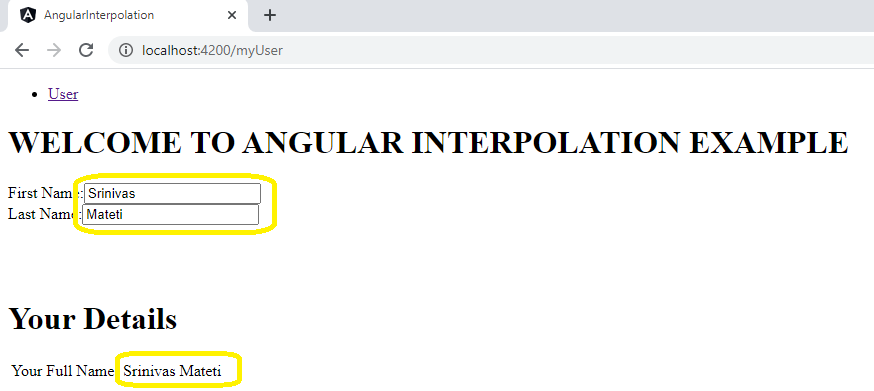
Step 7: Above step will enable two-way binding. Label will be updated with the data entered in the text box momentarily without any post backs and events.

Step 8: User interface should look like below.

4_8_UI

Bootstrapping angular and secrets of landing page.

Title: Bootstrapping angular and secrets of landing page.

Introduction: All my articles are compiled into simple steps with detailed screen shots and elaborative description. By following these steps even, a novice programmer should be able to replicate scenario. Please go through the steps and provide your valuable feedback to make my next articles more clearer and intent.

This is 3rd article on Angular.

Follow below mentioned 11 detailed steps to learn about “Bootstrapping angular and secrets of landing page”.

Please follow below links to view my other articles.

Create Angular

Angular Navigation

In this article we are going to discuss on below points

  • Angular in build landing page mechanism
  • Change default landing page behaviour
  • Is app component compulsory for your angular application?
  • Custom app component

Tools being used:

  • Angular CLI/Command prompt
  • Visual Studio 2017

Step 1:   Index.html and main.ts are the start up pages for angular application. “Angular.json” and “tsconfig.app.json” will have that configuration information as shown in below screen print.

Step 2: By adding my custom index and main, I will override above behaviour. Add 2 new files to src folder from visual studio, and name them as any.html and anymain.ts.

Add content to these newly added files. I moved the content from index.html to my new html file and main.ts content to my new ts file.

Step 3: Subsequently update “angular.json” and “tsconfig.app.json” with new file names.Your config files should look like below. Now these newly added files will play the role of start-up pages for your angular application.

Step 4: Review the contents of html and main.ts files to understand how angular loads landing page.

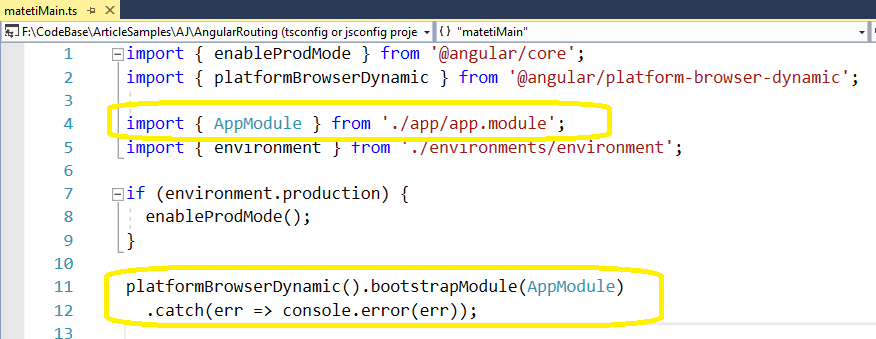
Step 5: “bootstrapModule” method in main.ts will load angular route module. In below screen print, bootstrap is loading AppModule as default module. You can change this value, if you wish to change default module. However, I am not going to change this value and continue to use appmodule as default module.

3_5_bootstrap

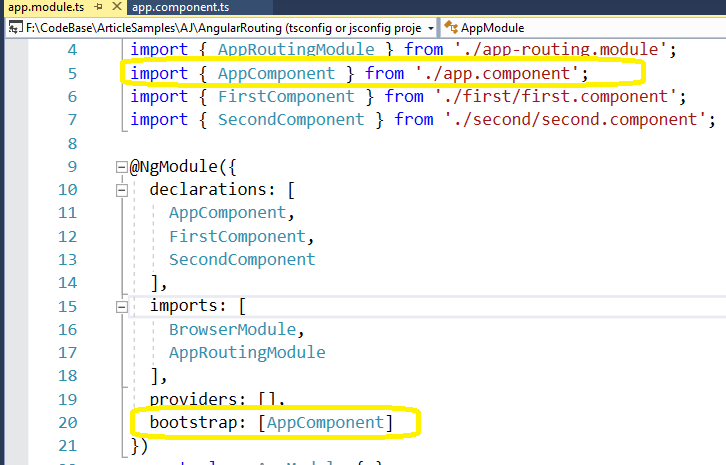
In app.module.ts value provided to bootstrap property will decide which component to be load by default. Currently its configured to load AppComponent. In next steps, I will change this value to my custom component.

3_5.2_appmodule

Step 6: In index.html, app-root tag will represent and help loading app module component as landing page. Same app-root will be used in app component as shown below.In next steps this value will be changed.

Step 7: In next steps I will explain how to use load other component as default, instead of app component.

Step 8: Add a component to your application. In this case I named it as first component.

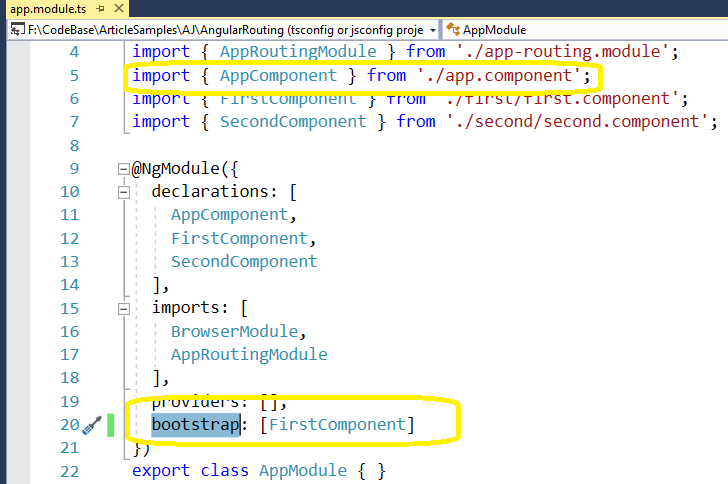
Change bootstrap property of app.module.ts from “AppModule” to “FirstComponent”. We need to import FirstComponent on each page where ever referring.

3_8_First

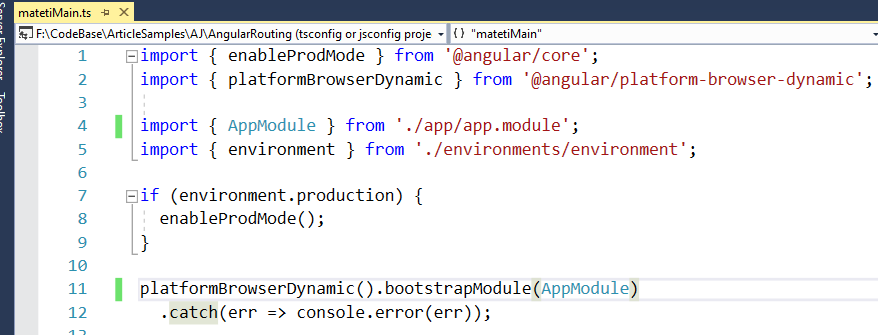
Step 9: main.ts content remains same. If you wish to change default module, change main.ts content. However, I do not want to change default module. That keeps main.ts content as is.

3_9_main

Step 10: Make sure that FirstComponent selector value and html tag in index have same value.

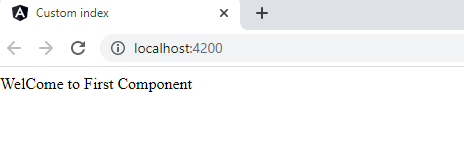
Step 11: Now your angular landing page have been changed from app.component.html to First.component,html. Your application home page looks like as below after building and deploying application.

3_11_NewHomePage

Happy Coding!!!

Navigation controls in Angular

Title: Set up navigation controls in angular application using Routing.

Introduction: All my articles are compiled into simple steps with detailed screen shots and elaborative description. By following these steps even, a novice programmer should be able to replicate scenario. Please go through the steps and provide your valuable feedback to make my next articles more clearer and intent.

This is 2nd article on Angular.

Follow below mentioned 10 detailed steps to “Set up navigation controls in angular application, using Routing”.

Tools being used:

  • Angular CLI/Command prompt
  • Visual Studio 2017

Step 1: Create an angular application by using angular CLI.

Please follow below link to learn how to create angular application using CLI.

Create Angular

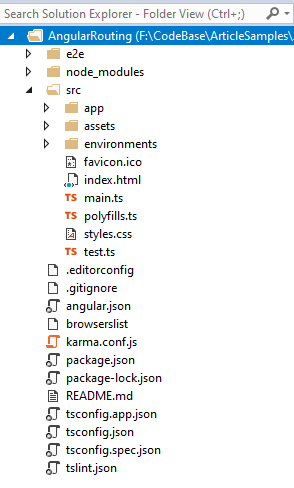
Step 2:  Open angular application using visual studio. Your application would look like below.

2_2_Project

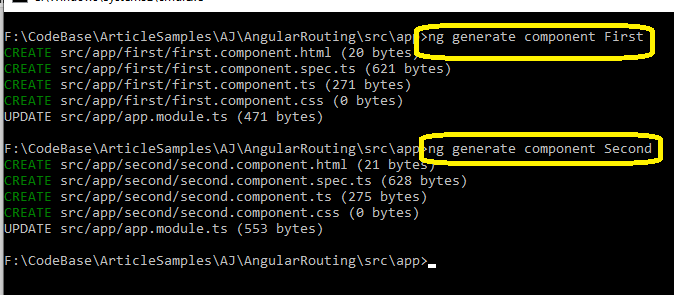
Step 3:  Navigate to src\app folder, using command prompt and add 2 components by executing “ng generate component ‘component name’”. Please see below screen print.

2_3_New_Component

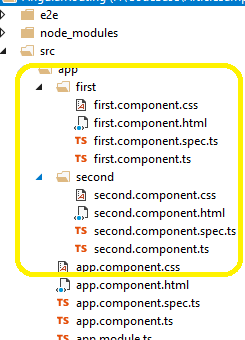
Step 4: Two new folders will be added to src\app folder.

2_4_ComponentFolder

Step 5: Now It’s time to work on defining navigation links for newly created components .”app-routing.module.ts” is the one which takes care of routing information in angular application.

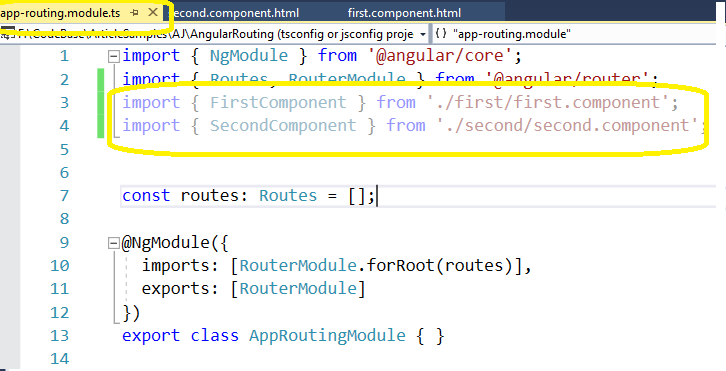
Step 6: Import newly added components to “app-routing.module.ts” as shown below.

2_6_Import

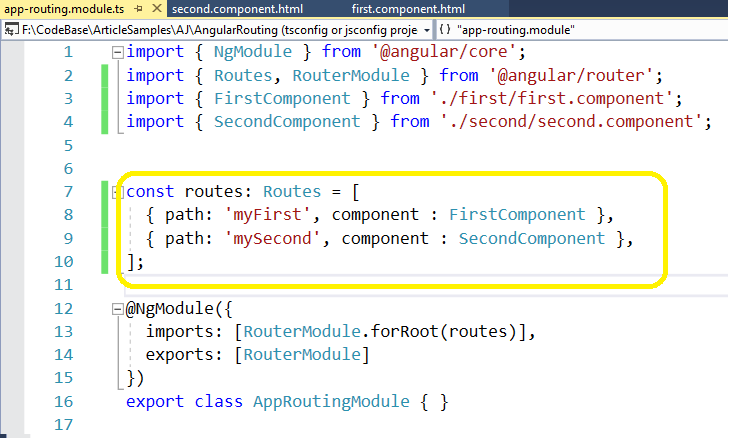
Step 7: Then add those components to route array as shown below. Path will be used as key and component will be like location. This path(key) will be used for link definition in next step.

2_7_RouteArray

Step 8: Now the components have been equipped with route information. We need to define links. Generally, links need to be added to any HTML Page, preferably landing page. In angular, app.component.html is the landing page. Remove default code added in app.component.httml and define the links as mentioned below.

Step 9: By using <nav> element define the 2 links as shown below. Route link is the path(key) we added in app routing module In previous steps.

2_9_Links

Step 10: Run your application using “ng serve -o” command. Application will be loaded with links. Click the links to navigate to specific pages.

As following above steps, you can define navigation controls in angular application.


Happy Coding!!!


Title: React#2: Tic Tac Toe Game Functional Version Part #1

Title: React#2: Tic Toe Game Functional Version Part #1

Introduction: All my articles are compiled into simple steps with detailed screen shots and elaborative description. By following these steps even, a novice programmer should be able to replicate scenario. Please go through the steps and provide your valuable feedback to make my next articles more clearer and intent.

This is 2nd article in React series. In official react site(https://reactjs.org/tutorial/tutorial.html), tic tac toe game has been demonstrated by using class components. This article is explaining same tic toc toe game by using functional component.To make article simple, divided this topic in to 2 parts and this is part 1.

Please visit my previous article, Set Up React to check out the steps to set up react application.

Expectations: After completing this article, reader can able to

  • Define functional component with dependencies
  • Event handlers in Function component
  • Pass information between components
  • Use hooks

Follow below mentioned 11 detailed steps to “Set up first React application”.

Tools being used:

  • Visual Studio 2017 Or Visual studio code
  • Command prompt


Step 1: Open react application by using Visual Studio(already created in my previous example Set Up React)

Step 2: Add new js file to src folder and name it as game.js . Import react statement to game.js.

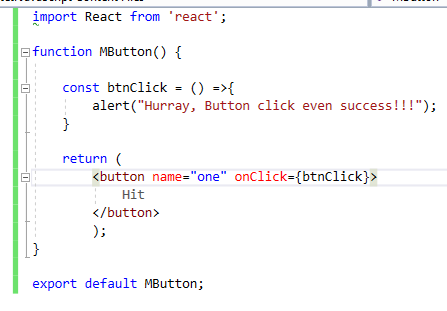
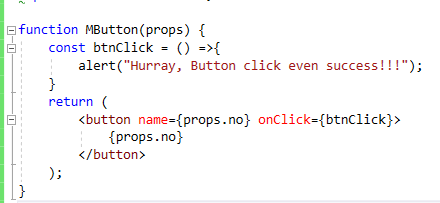
Step 3: In this step we are going to see how to define a button and add an event to it. Create a function and name it as MButton. In return statement of the function create a button and attach an event to it. Here we can use const to define an event. Export the function. Below is the screen shot.

3_MButton

Step 4: Go to index.js, import & render Game component.

4_Index

Step 5: Run the application and a button will be created and click event will show a message.

5_OutPut1

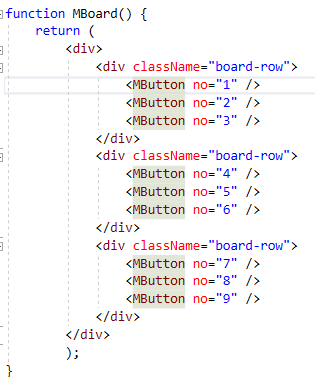
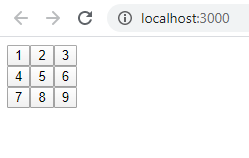
Step 6: Now above button component need to be used to build our tic tac toe game.Remove export statement. Define another function and name it as MBoard. Render the above component. Pass serial number while rendering.

6_MBoard

Step 7: Now change MButton function little bit. Add props parameter to MButton function. MBoard function is passing serial numbers while calling it. Use this no from props and assign it to button control.

7_Props

Step 8: Add one more component Game and render MBoard in it.

8_

Step 9: When user clicks on a specific button, for example when user clicks on Button no 5, an alert message needs to be displayed and number 5 should be replaced with ‘X’ character to symbolize already this button has been addressed or used. To achieve this , we need to use hooks (useState)

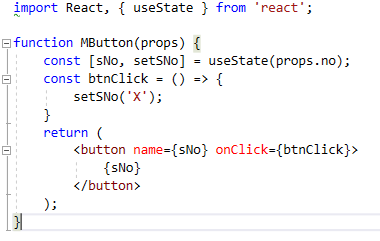
Step 10: Import useState in game.js file. Define a sNo parameter and assign default value as props.no which is being passed from MBoard component. Then use that sNo parameter to bind and display the text on button. In click event of the button, call setSNo and pass X as parameter. Now when use clicks on any button , the text will be replaced with X. And code looks below.

10_

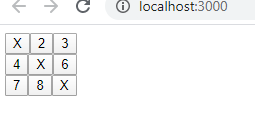
Step 11: Now Board with 9 serial numbers will be displayed, when user clicks on any number, that will be replaced with ‘X’.

11_

We completed only half the game. Still we need to play with the code top proceed further in the game. To make the article simple, will publish further steps in my next article.

Happy coding !!!

React#1: Set up react first application.

Title: React#1: Set up react first application.

Introduction: All my articles are compiled into simple steps with detailed screen shots and elaborative description. By following these steps even, a novice programmer should be able to replicate scenario. Please go through the steps and provide your valuable feedback to make my next articles more clearer and intent.

This is first article in React series. Installation of react application will be described in detail.

Follow below mentioned 8 detailed steps to “Set up first React application”.

Tools being used:

  • Visual Studio 2017 Or Visual studio code
  • Command prompt 

Step 1: Download and install node js from https://nodejs.org/en/

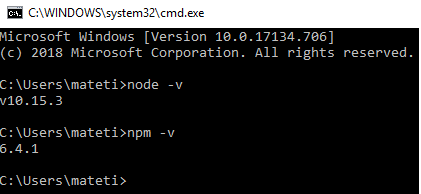
Step 2: Current version of the node & npm can be verified by using the command

respectively “node -v” & “npm -v”

1_3_NodeNPMCheck

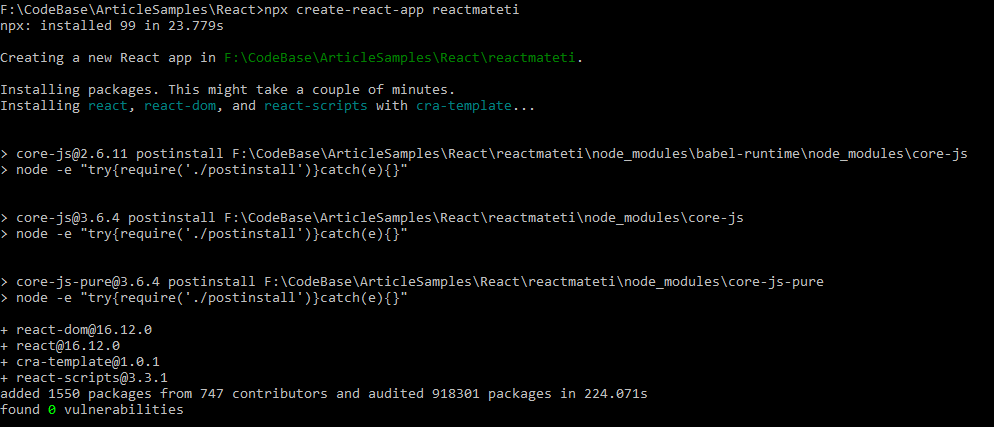
Step 3: Open command prompt, navigate to folder where you want create react application, and execute command “npx create-react-app {{appname}}” as shown below. Do not use capital letters in application name.

3_npx

Step 4: In command prompt navigate to src folder and execute command “del *” to remove all the react default content.

4_Del

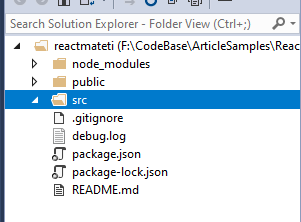
Step 5: Open project in visual studio and solution looks like below

5_Sol

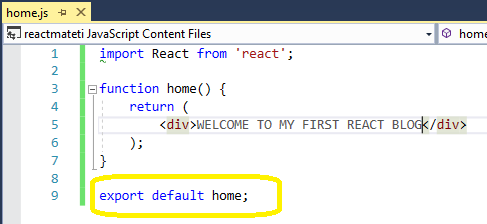
Step 6: Add home.js file to src folder. Import react. Define a javascript function and return html content like some welcome message. And code in home.js looks below6_Home

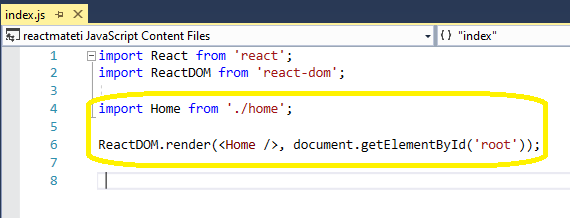
Step 7: Then add index.js and add logic to render DOM. In index.js we will refer home.js and renders its content. When importing any function in react use first letter as uppercase. In this case Home.And code looks as below

7_index

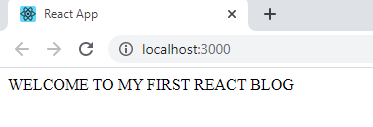
Step 8: Then in command prompt execute command “npm start” to run your react application. The page loads and displays information as below.

8_Done

Note: As this article is about installation and first react application set up, did not cover other things. Please read my next react articles on other part of react.


Happy Coding!!!