Title: Programmatically Creating, Accessing and Processing Azure Queue Messages
Introduction: All my articles are compiled into simple steps with detailed screen shots and elaborative description. By following these steps even, a novice programmer should be able to replicate scenario. Please go through the steps and provide your valuable feedback to make my next articles more clearer and intent.
Srinivas
Note: I took help of various internet sources while researching this item. Credit goes to internet and Microsoft communities. This is one of the topics in Azure certification.
This is my 10th article on Azure.
Please follow below links for my previous Azure articles
Azure Key Vault With Logic App
Azure Key Vault With Data Factory
Accessing Azure Bloc Containers
Follow below mentioned 16 steps to Access Azure Message queues by using dot net core application.
After completing this blog, you will be able to do
- What is Message Queue in Azure Platform.
- Creating, Accessing Azure Message Queues Programmatically by using dot net core application
- Performing CRUD operations on Azure Message Queues
Sample Description: We are going to create a message queue in Azure platform and perform CRUD operations.
Step 1: Open Azure portal (https://portal.azure.com)
Step 2: Create a storage account as shown below

Step 3: After successful creation, please access the storage account go to access keys tab and collect the connection string. In later steps, we will use this value to access storage account by using dot net core application.

Step 4: Open Visual Studio and launch Terminal. Execute below command to create dot net core application.
dotnet new console –name MSMQProject –output .

Step 5: By default classes and names spaces related to MSMQ will not be included to dot net core application. We need to install and import couple of packages by using nuget manager.
By using below command install msmq packages
dotnet add package Azure.Storage.Queues –version 12.0.0

Step 6: Now run “dot net build” command to make sure packages get installed properly.
Step 7: All set for writing MSMQ code. Open Program.cs file and include name spaces related to MSMQ. Your name space section should be look like as below.

Step 8: Define 2 variables to store connection string and message queue name. And assign storage account string we collected step 3. Make sure queue name value in lower case.

Step 9: In this step, we are going to add logic which will access storage account and creates a queue if does not exists.
Create object of “QueueClient” and pass connection string and queue name as parameters.
Then call CreateAsync method which checks whether the queue exists or not. It will create the queue if does not exists. If exists, it will create connection for it.

Step 10: Execute command “dotnet run” and check the console out put. Also go to Azure portal and verify whether queue created or not


Step 11:Now we will Create messages by using core application by adding below lines of code.
await client.SendMessageAsync(Convert.ToBase64String(Encoding.UTF8.GetBytes(greeting)));

Step 12: Run application again and check the message queue. This time you will see 3 messages.

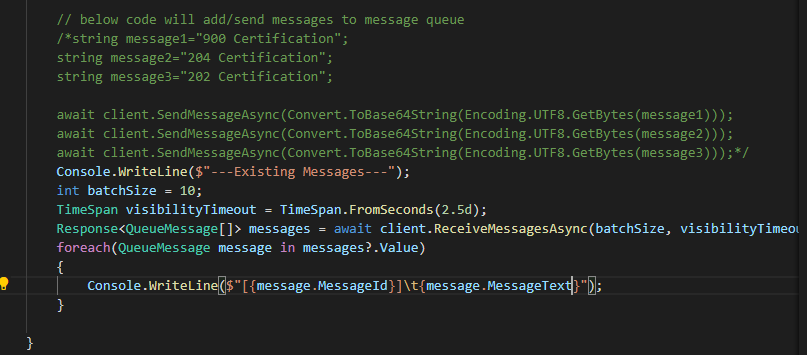
Step 13: In this step, we are going to read the messages we inserted. First comment the code we added in step 11.
And add below code to read messages from message queue. While reading the messages we need to define time out period.
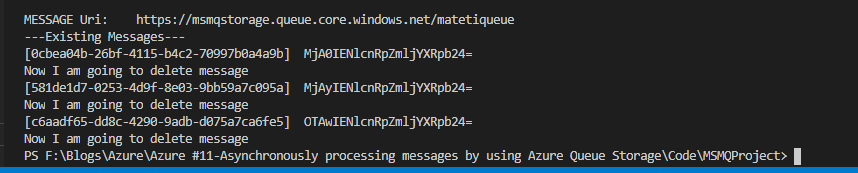
Step 14: If you run application now, you can see console is displaying messages. However, the messages are encrypted.

Step 15: Finally we will see how to delete messages from queue.
Below code will be used to delete messages
await client.DeleteMessageAsync(message.MessageId, message.PopReceipt);

Step 16: Run the application and verify queue. Messages will be deleted

In later articles I will explore and explain more about message queues.
Happy Coding!!!

5 thoughts on “Programmatically Creating, Accessing and Processing Azure Queue Messages”